Hanging Coffee Can Chicken Feeder

Tags

, , , , , , ,

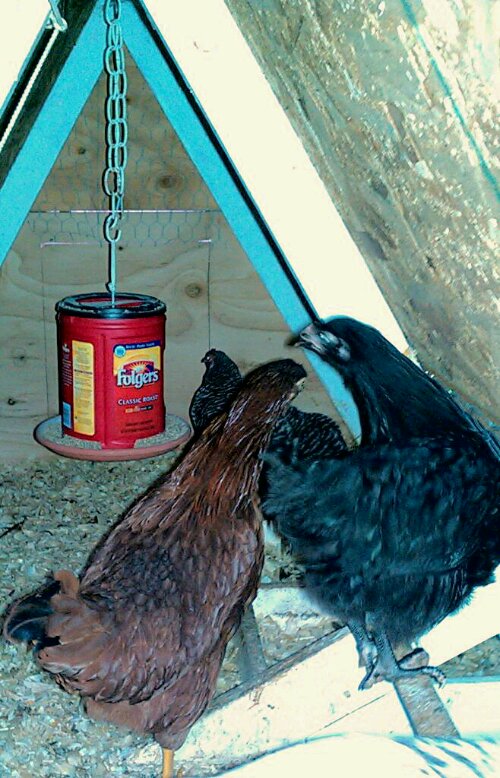
My little hanging chicken feeder became too small for our flock of 5 and the next size up (5 gallon) was way too large to fit into our little A frame hen-house so I scrounged around and came up with this.

image

You need:

-A plastic coffee can with lid for the hopper (I used a large Folgers coffee can,  the tall one from Costco)

-A tray for the feed well,  about an inch larger than the base of the hopper and approximately 1 inch deep.  I used a plastic plant drip tray I had lying around.   A pie tin would also work.

-3 small nuts with bolts and possibly washers

-a length of cord for hanger (about 2 or 3 feet)

-a pair of sharp utility shears

-a drill and bit

If you want a bigger feeder, or a smaller one, or have different materials available, just use the basic design to do your own thing.  It’s not rocket science.

image

Using a 3/4 inch bit, I drilled 8 holes spaced evenly (eyeball it)

image

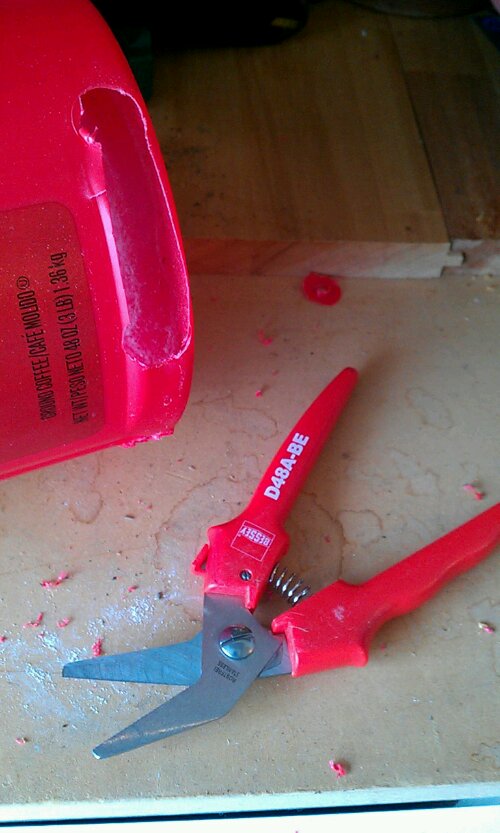
You will need a pair of sharp utility scissors or a good utility knife to remove the plastic between sets of holes.

image

Using a drill bit slightly larger than the shanks on your bolts, center the coffee can in the tray and drill through both as shown making 3 holes around the edge and one in the center.

image

Attach can to tray with nuts and bolts. Run the hanging cord through, tying a big knot underneath.

image

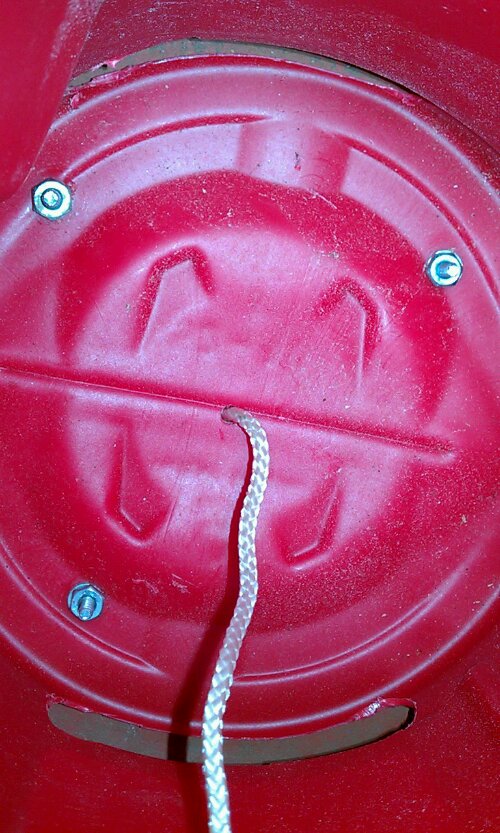
In the coffee can lid, drill holes as shown, cut 2 half circles, leaving a strip down the center. Run cord up through center hole and out of lid. Snap lid on can and make a hanging loop at desired height. (I use a section of light chain to hang mine because it makes it really easy to adjust height)

image

Filled and ready to hang!

image

My girls are notorious for beaking out food, creating unacceptable waste so I cut a donut of some scrap corrugated plastic (I have also used plastic canvas for this) to fit around the hopper and sit on top of the feed tray. Drill holes and cut slots as for the bottom of the hopper.

Hang the feeder at shoulder height.   If your hens are used to a stationary feeder,  you may need to hang it low and gradually lift it as they become accustomed to the motion.

WooHoo!   Free feeder.

Refreshing Home-Made Frugal Electrolyte Drink

Tags

, , , ,

I learned the hard way that drinking water when exerting my (aging) body is not enough.   Here is my recipe for an electrolye-replenishing drink to whip up at home.

1 gallon pure water
1 cup sugar of choice (NOT artificial sweetener)
1 packet powdered drink mix such as Kool Aid
1 tsp low sodium salt replacement

Don’t skip the sugar or the salt replacement.   This is the source of electrolyte.   If you don’t like using the powdered drink mix,  use an unsweetened fruit juice of your choice.   Lemon and lime are excellent choices.   Chill and drink up.

Another good drink for electrolyte reacement is tea.   Black tea is rich in minerals,  especially potassium.

Eat Your Hosta!

Tags

, , , , , , , , ,

I started to write my own post on edible hosta shoots but why when this post is so well written? Yes, I tried them and they are much like asparagus. Try them!

My nephew Tom DeSimone has been writing a blog about thinking deeply and living simply in Gardiner, NY. His most recent posting referred to a dinner of wild garlic mustard pesto and a side of hosta shoots. Hostas? I went straight to the garden where I thought I had dozens of hostas just coming up. A week of rain has encouraged most of my hostas to unfurl. Still, I found three or four plants at the early stage of sprouting, two of which I had planned to move anyway. Using a sharp paring knife, I cut one short, tightly wound shoot close to the soil, rinsed it well under cold water, and ate.

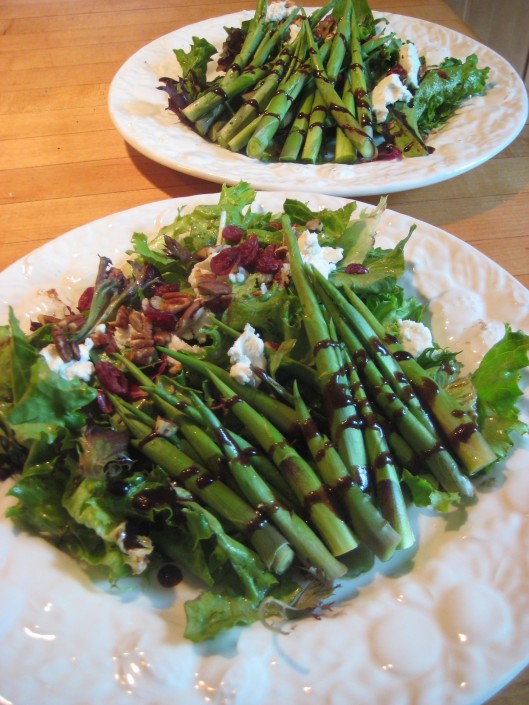
Cool and crisp, with the dense snap and fresh green flavor of asparagus, hosta leaves a slightly bitter after-taste that quickly dissipates. It was wonderful!

The excitement sent me to the web to learn more about eating…

View original post 630 more words

Ch… Ch… Ch… Chia Seeds

Tags

, , , , ,

I have found a new love in a most unexpected place.  Chia seeds!  Not just for sprouting fur on funky little figures,  chia seeds are said to be a nutritional powerhouse brimming with fiber, omega 3, protein and minerals.

They can be sprouted,  sprinkled,  baked,  ground and soaked.  My recent obsession is soaking them in a smoothie or making a drink known as Chia Fresca,  a simple concoction of lemon juice,  sweetener,  water and whole chia seeds.   Combine them and soak for at least 10 minutes to allow the seeds to absorb the liquid.   They will form a gelatinous coating similar to the coating on tomato seeds.   The seed within retains a little crunch like a poppy or kiwi seed.   The chia seeds is virtually tasteless,  drawing flavor from the food with which it is combined.

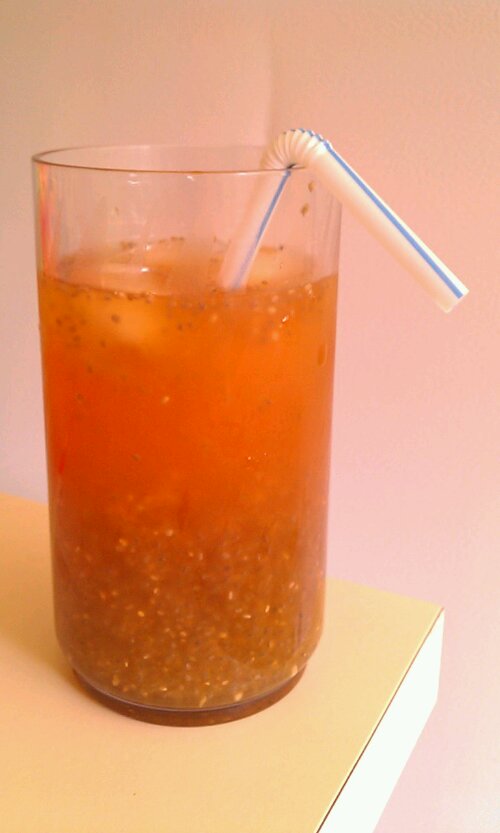
I like to make this drink with cold tea (green,  black,  or whatever you like).  This morning,  I used 1/4 cups tangerine juice claimed from some past prime gems,  topped up with black sun tea, ice and no sweetener.   YUM!   Super refreshing.   I use a straw to keep the seeds stirred in.   The feel of those little bubbles zipping up the straw and into my mouth is hard to describe but I like it!

image

In my neighborhood,  chia seeds are available at WINCO in the spice section of the bulk foods.   I believe Bob’s Red Mill sells them in bags as well.

What is your favorite way to use them?

Ornamental Edibles. Front Row Placement for Beautiful Food!

Tags

, , , , , , , , , , , ,

image

As another garden year begins, I am again looking for new spaces to grow more food. I enjoy growing my own and try to eat organically as much as possible.   Growing your own is convenient, tasty, can be less costly (especially when you consider the price of organic) and provides healthy stress-busting activity.

Whether a prepper, a market grower, or a home gardener, you can surely find a use for more edibles from you gardens! If your municipality or neighborhood association says you can’t grow edibles in your front yard area, hide your veggies in plain sight.  Many edibles also double as gorgeous ornamentals.

I asked this question on my Facebook page…
“What is you favorite edible ornamental? Or ornamental edible?”

Answers included kale, peppers, dill, rainbow chard, evergreen blueberries and huckleberries. I’ll throw in a few of my own too! 

KALE – trendy kale is a super food meaning it is very nutritionaly dense.  It is an excellent source of beta carotene, vitamin K, vitamin C, lutein, zeaxanthin, and is reasonably rich in calcium. Kale, as with broccoli and other brassicas, contains chemicals believed to fight cancer.  It’s beautiful edible leaves range from lacy purple to bold, crinkly green and almost every color in between, including variegated forms.  One to try is Territorial Seed Company’s “Purple Peacock”, a broccoli/kale cross with a continuous supply of tasty side shoots and delectable kale leaves.  This year I am adding Nichols Garden Nursery’s big, bold “Tuscan” for a nice textural contrast. 

PEPPERS –  I am told the small ornamental pepper plants sold at your local garden center and covered in cute little upright peppers have a nice fruity flavor.  I want to pick some up to try this year.  I personally have had little luck with bell peppers but do well with hot peppers and find them pretty enough to earn a place up front.  They come in so many shapes and colors!   You might want to try screaming hot Baker Creek’s Chinese 5 Color or milder 5 Color Marble Pepper.  Give them a nice hot spot in your garden.

CABBAGE – As you can see from my banner photo, I love the color and structure of cabbage.  It’s bold and solid. Both purple and green varieties will remind you of stones in the garden.  Purple cabbage is especially striking. Long season varieties should be started in spring while short season types are excellent for fall planting.

PARSLEY –  this delicate-looking beauty, with either flat (Italian) or stronger-flavored curly foliage lends a fresh, ferny element to my gardens.  Much more than a garnish, parsley is high in vitamins A and C as well as iron and folic acid.  Use it in potato dishes, add to soups or make Parsley Walnut Pesto.  It’s a favorite for juicing and chickens love it!  In my zone 8a garden here in Western Oregon, I am able to harvest year round.  If it freezes, just wait until it thaws before harvesting!

BLUEBERRIES – here in Western Oregon, blueberries thrive.   The sometimes evergreen shrubs make handsome ornamentals with a sweet bonus.

ONION CHIVES – these perennial onion relatives form a spiky clump in spring then send up rosy pom pom flowers.  I love fresh snipped chives on salad or in my favorite home made red potato salad.  In fall, nestle some in a cute pot for your window sill herb garden.

GREEN BEANS – that’s right. I said great beans.  Most pole varieties are attractive vines but some are really quite striking. One of my favorites is another Territorial Seed Company variety, Violet Podded Stringless Bean.  The vines are purple with deep green leaves. The purple pods following rosy flowers are lovely, easy to spot and pick and stay tender when large. The pod is very fleshy and juicy so they make a great snap bean. 

image

EGG PLANT –  I must admit, I am no expert on growing eggplant.  Last spring, my first attempt to grow it (from seed) was foiled by a very wet, cool spring.   But with it’s big, shiny, gem-like fruits in tones ranging from white to deepest purple I will try again, perhaps from plants.  Then again, I may try the seed route again just because I am stubborn determined!

HERBS – I love herbs both in the garden and the kitchen. Lavender, thyme of all shapes and colors, stately rosemary are my favorites. Give them a sunny spot with excellent drainage and good air circulation and they will reward you well.  Beware mint and keep it contained. It’s a bully that will spread underground to bully its neighbors.

STRAWBERRIES – mmmmmmmm. 

image

Nothing beats the taste of your own fresh-picked organic strawberries.  They are one of the best to grow at home because conventionally grown strawberries are amongst the dirtiest produce when it comes to pesticide residues.  (Dirty Dozen list)

Hopefully, you’re inspired to take a fresh look at your plantings for new possibilities.   Your taste buds will thank you!
Do you have a favorite ornamental edible? 

*A disclaimer here. I’ve mentioned several Territorial Seed Company varieties. I have no stake in this. At this time, they are neither my advertiser nor sponsor (though that would be great!)  They are simply my favorite quality local seedhouse for the past 25 or so years.

Easy Berry Banana Smoothie

Tags

, , , , , , , ,

This is not very fancy but just what the doctor ordered for a healthful start to the day. So easy and tasty too!

Easy Berry Banana Smoothie

For each serving, place in blender…

1/2 cup fat-free Greek yogurt (double the protein of regular yogurt)
1/2 cup frozen berries of choice
1/2 cup banana slices (I use frozen sliced super ripe bananas that I keep handy)
Splash of milk, juice, or water
Bit of real vanilla extract (vanilla bean flecks would be yummy!)
Squirt local organic honey

Blend until smooth, adding liquid of choice as needed for desired consistency. Enjoy in good health!

image

Mmmmm. I had to get the big straw for this one.

What is your favorite smoothie recipe or ingredient?


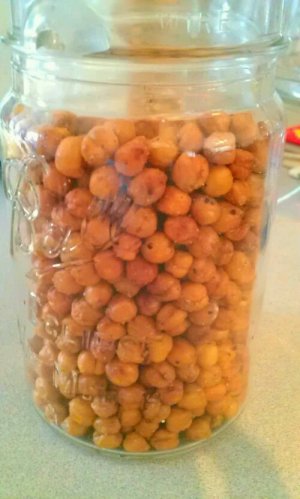
Roasted Chick Peas (Garbanzo Beans)

image

I finished my first batch of these yesterday.  Daughter thinks they are like corn nuts (I agree).  They also remind me of soy nuts.  In any case, they are quite tasty and packed with nutrition!

I started with instructions from one of my favorite blogs and adjusted to use dried chick peas instead of canned.

Start by either soaking the dried chick peas overnight or opening your can(s) of chick peas.  I started with a couple of cups of dry chick peas and after soaking had at least four cups.  Drain and rinse, then give them a pat to dry them a bit.  I guess the canned ones have some skin you may want to remove (personal preference) but I didn’t find any to speak of on the soaked peas.  If I had, I probably would have left it.

Coat the peas with about a tablespoon of good olive oil and whatever seasonings you choose.  I used a tablespoon of granulated garlic, a teaspoon of sea salt and a bit of ground black pepper.

Spread on two cookie sheets and roast at 400*f for 40 minutes.  Sprinkle with more salt if you like.

Cool and store at room temperature.

Planning Your Perfect Vegetable Line Up

Tags

, , , , , , , , , , , ,

Another rainy day in the Willamette Valley.  For those of us here in western Oregon, along with many other areas of the country, its time to get the spring garden going.  For reference, I am in USDA zone 8a.  It’s a temperate maritime climate with a good winter chill, but relatively warm compared to most of the US.

As far as growing food goes, I am no expert.  Many years ago, I grew a few ‘maters and who knows what (who can remember) but only in the last few years have I seriously ventured to produce food.  Sometimes I wonder what right I have to share my limited knowledge with others but then I realize that my journey may be just as valuable as any other more expert advice. As I study, plant, re-plant, adjust, edit, document, try, and try again,  I gather experience and insight invaluable not only to myself but, hopefully, to others. I am blessed to have connected with a bounty of friends on Facebook.  Happily, they seem always to be ready to help me learn, understand and grow.  I don’t fail because the only true failures are failure to try and failure to learn. As long as I keep trying and learning, I am succeeding.

So, while the rain drips, I will ponder how to squeeze the very most from the resources available.  Space, sunlight, weather, water, nutrients, and my garden goals all have a role in this planning.  My homestead is a mere 1/3 acre in a rural town. Neighboring trees shade much of my current growing area (6 raised beds) so that planning becomes a very big deal.  I pay for my city water.
image

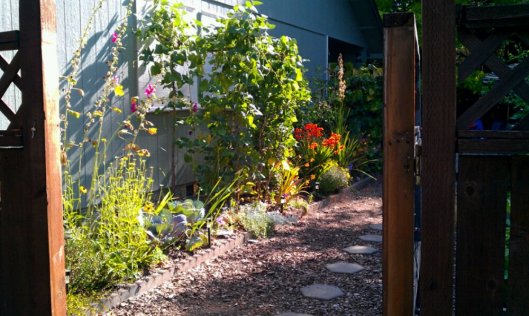
This south facing border used to be filled with flowering perennial. it now is home to tomatoes, green beans, parsley, and purple cabbage. As you can see, the shade from neighbor's tree falls just short of this space. This photo was probably taken about noon sometime in mid-August. my raised beds would be to the right so you can see how much shade the take the first half of the day. Some of them stay mostly shaded all day.

Last spring, I evicted some lovely but not so edible perrenials from a prime south facing raised border to make way for more food plants and was so happy I did. The tomatoes loved the spot and, staked, trimmed and trussed, produced nicely despite a lousy summer for heat-loving crops.  Several of the shadier raised beds were given over to lettuce, carrots, chard and other crops not so sun-needy. A quick Google search will provide you with sites listing plants that produce in the shade but its pretty simple. Plants that produce fruit (fruit being the seed bearing portion of a plant such a peppers, tomatoes, corn etc.) need the most sun.  Plants grown for leaves, roots, or stems require less sun to produce well.  Sometimes they even produce a preferable product with some shade. These plants include lettuce, chard, carrots, etc.  A few plants such as green beans buck the rules a little. Green beans will produce well in part shade but won’t give you quite the crop they will in full sun.

Companion gardening is another piece of my planning. Here, I will say, it can become very confusing. I look over some lists of good and bad companions and just do my best to group plants accordingly without letting it make me crazy.  Only a few combos are really a problem so don’t let it make you crazy either.

This leads me to one of my most challenging considerations in my garden plan. Space. 1/3 acre can grow a lot of food BUT I don’t have 1/3 acre to grow food. A house, some outbuildings, play equipment for children, lawn (I know!), and inhospitable ground all take chuncks from the available total.  Every year, I want to grow more. Before you get really serious about starting your garden, you will probably want to take a few minutes to consider your goals.  If your goal is to preserve lots of food, your plan will be a little different than if your plan is to eat fresh from your garden year-round.

This year I have several goals:

1. Grow and preserve all the tomatoes products my family will consume in the next year.

2. Grow our family supply of delicious organic popcorn!

3. Harvest year-round or as near to it as possible.

If you are like me, you want it all and will put in quite a few hours crafting the perfect plan for your family.  Whatever your goals, don’t let the various considerations hang you up to the point you don’t move forward!  Take a chance, make some notes and if it doesn’t go like you planned, adjust the next planting and enjoy giving it another go.  The journey is as fun and valuable as the destination.

Resources to Help Plan Your Perfect Garden

EWG’s Shopper’s Guide to Pesticides in Produce (Clean 15 and Dirty Dozen) this guide will help you decide what foods might be good choices for your precious garden space if eating organic is important to you…and it should be! 

Oregon State Extension publication on Fall and Winter Gardening in the Pacific Northwest This .pdf will help gardeners in the Pacific Northwest or similar climates plan what to plant in the spring for summer harvest, what to plant in summer for fall harvest, and what to plant in late summer/fall for overwintering.  Also lists best varieties for each.

Best Shade-Tolerant Vegetables (Mother Earth News)

Companion Plants for Better Yields I like this particular chart because it combines both compatible and incompatible combinations side by side, making it easy to use in planning.  Please note that plant compatibilities are a matter of opinion and subject to a certain element of disagreement amongst growers.
My Go-To Recipe for Chocolate Chip Lovers

image Irresistible Spicy Chocolate Bars

This is a slight variation of one of my Mom’s go-to recipes when I was growing up.  It’s a chocolate chip type bar cookie with spices added to make it unusual and truly irresistible. Its beauty lies in the fact that it both can be made in good quantity very quickly and never fails to please big so it is perfect for groups and pot lucks.  You won’t want to increase this big double recipe for a home mixer or it will be too much to mix without a big mess!

1 1/2 cup real butter
1 1/2 cup sugar
1 1/2 brown sugar
4 eggs
2 tsp. real vanilla
3 cups all purpose flour plus 1 cup whole wheat flour OR 4 cups all purpose flour
4 tsp. baking soda
1 tsp salt
4 tsp. cinnamon
1 tsp. clove
1 tsp. nutmeg
1 package (2 cups) semi-sweet chocolate chips

PREHEAT oven to 350

CREAM margarine and sugars til light and fluffy

BEAT in eggs, 1 at a time

ADD vanilla and mix in

COMBINE AND ADD dry ingredients

STIR IN chocolate chips.  To make the finished product look prettier, reserve part of the chips to sprinkle on top before baking.

SPREAD into 2 un-greased cookie sheets.  It will spread thinly but will rise up to fill the pan.

BAKE for 20 minutes or until toothpick inserted in center comes out clean.

COOL on wire rack.

CUT into squares when almost cool (I use a pizza wheel)

MAKES about 5 dozen 2-inch cookies.

Mmmmmmmmmmmm!

When Compost Goes Bad (this mean war!)

Tags

,

Fruit flies. Only scientists love those little dudes. I was very pleased that the compost in my plastic bin had heated up very nicely. I am a constant but not very textbook composter.  Put another way, I compost everything (including the kitchen waste from granny’s house) but I am terrible when it comes to altering green and brown, turning, containing, etc. I usually have a couple.of piles in varying degrees of decomposition and recently added a free plastic bin. Over the last season, I did begin covering my piles, having realized that the heavy winter rains of Oregon were keeping it so sodden I couldn’t turn it without using my entire day’s allotment of energy.  Another challenge I deal with is dog, the compost-eater.   Things that put in his dish would have him looking at you as if to say, “what’s up with this slop?” suddenly become irresistible in the compost pile.  The bin solved this. All food goes into the bin and is unreachable by nasty (but cute) dog.

And so began an adventure.  The bin filled nicely, packing down to hold a surprising amount of material. It heated nicely too with all the green material in the form of veggie trim and findings from kitchen and garden.  It actually heated up!  It bred a bazillion fruit flies.  I could not open the cover without needing a face mask to breath, the air being so thick with frenzied fat fruit flies.

So Sunday I Googled “fruit flies compost”.  Ding ding ding!  Too much green (wet) material. Of course!  Somewhere in my heart I knew I was creating a highly unbalanced mixture.  I had noticed a gooey sludge escaping the base of the bin and had inexplicable ignored this red flag.  But now that I had seen the light (and eaten a few too many fruit flies) it was time to fix this.
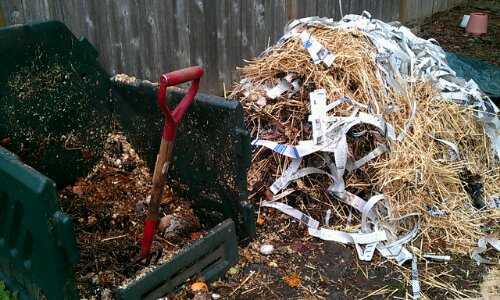
I headed out with shovel and gloves.  My plan: remove the contents to a new pile, adding a generous amount of brown material throughout.

The top layer wasn’t too bad. I placed it next to the bin and added some straw from my stash.  As I dug down, it got ugly. A stench rose.  It was heavy with the gloppy consistency of sludge.  Really gross.  So I rallied hubby to gather all the paper shred he could find and to help tear into strips a couple of brown bags of newspaper.  

image

I removed the glop little by little and added a LOT of paper and straw.  I placed a few pruned apple branches on top for air flow and covered it with an old tarp to maintain some degree of moisture control. Then, I prepared the bin for another round by placing the bottom corners on bits of wood to increase drainage and airflow then starting it off with a nice layer of straw and shredded newspaper.

The plan moving forward…
Add brown material in the form of newspaper and straw as I go.  (I should mention that dry leaves would also make a great addition but I used all mine this fall to squelch weeds in my perennial borders). Remove the contents to a pile after food has broken down enough to keep the dog away.

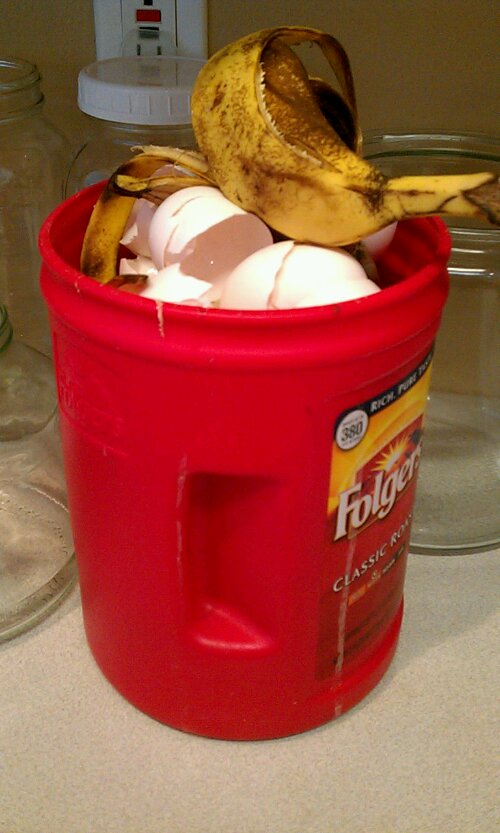
A few notes on kitchen composing my way. I start with a plastic coffee can in my kitchen counter. All coffee grounds, tea bags, veggie trims and waste, moldy bread, egg shells and any other compostable materials go in.  I keep this open and empty it sometimes daily or at most every couple of days into a 5 gallon bucket on my back porch. When the bucket is full or just getting nasty, I haul it out to the compost bin.  I also bring stuff home from ky grandma’s house. There, I keep a coffee can with a produce bag on the counter.  When it is full, I close the bag and throw it in the chest freezer.  This is so I can more cleanly deal with hauling it home and getting it into my bin but freezing also has the benefit of helping the materials break down more quickly.

image

First stop for comfortable materials.